Fire Particle Tutorial - Unity Shuriken
Welcome to my second tutorial on the Shuriken particle editor. For this tutorial I will be going over a basic fire particle effect that can be useful in many environments and games. At the bottom of this page is a bonus tutorial that can be relevant to both this fire particle and in other particle systems to create a cheap and good looking glow without the use of post processing bloom.
|
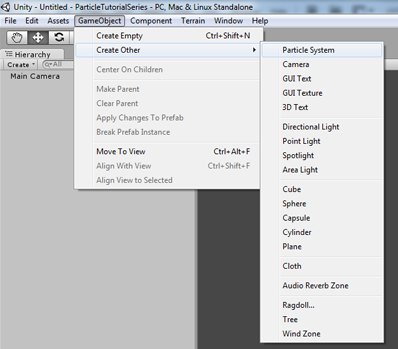
Firstly create and name your system and then zero it out in the world through the inspector.
You can as always work within the particle system inspector or open the editor window for more room and control, especially when you're creating an effects made up of numerous systems parented to each other. |
|
|
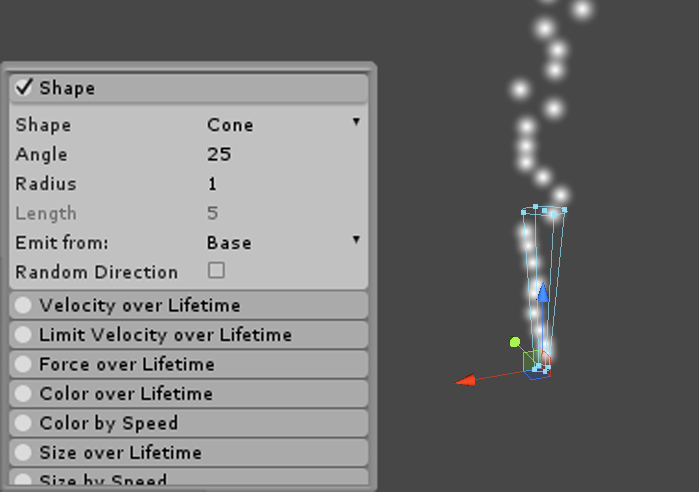
Usually when making a particle it is best to settle on a basic shape which will define the behavior of particles in terms of direction and spread. For fire particles like this one the cone shape in generally the best, adjust the angle and radius to make the particles emit more narrowly.
While still in the shape menu set it so particles emits from the base. Having that setting off will make the particles emit anywhere within the volume (or if set to surface will emit on the surface of the volume which isn't what we want, but would be cool or useful for a force field system). |
|
|
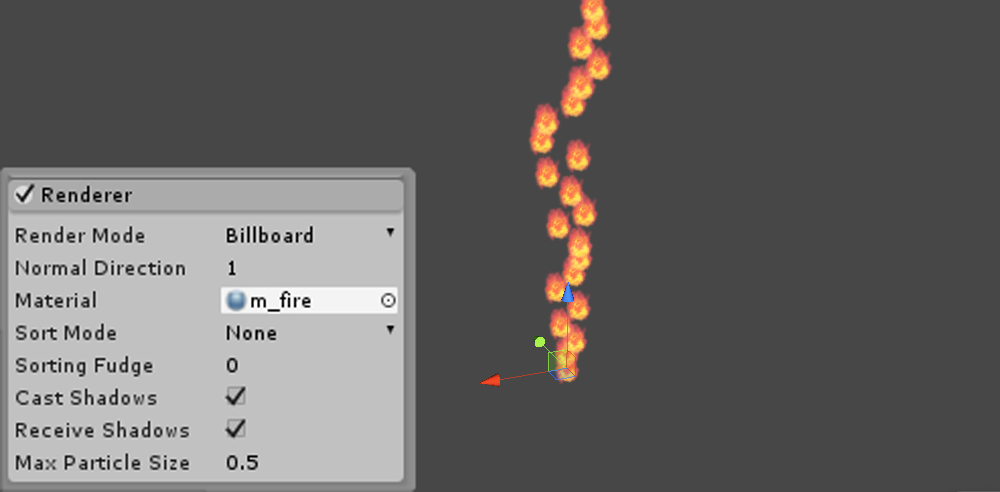
Now is a good time to set up the material as we fine tune the systems behavior. Go to the render tab and input your material. Ensure your materials shader is set to Particles>additive. This will give it better effects including a mask for the outside of the sprite and will allow control of the materials alpha which will allow you to fade the particle.
Keep the setting on bilboard. |
|
|
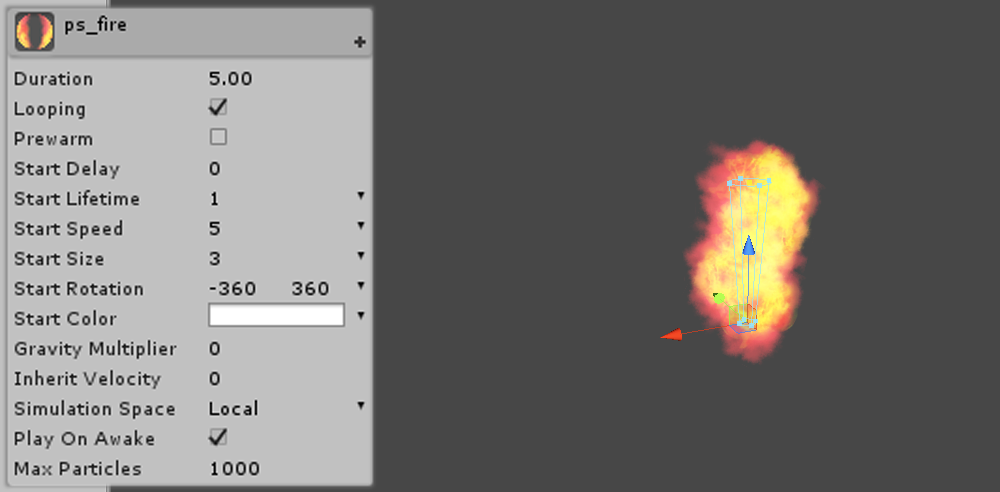
Now lets set the size, go up to particle system>start size. Focus on the base of the effect, the other bits can be fixed later.
Optionally you can add more variation to the particles by changing start rotation under the particle settings, depending on your material you'll set this in case its stretched. It can also be used to correct rotation in case its crooked. For random rotation click the little black arrow next to start rotation and set it to random between 2 constants set one to -360 and the other to 360. |
|
While we are here we might as well fix the lifetime, we can already see its way off and the particles are lasting too long. Set it to 1 or something close to that, may vary depending on what you're going for.
Lets also adjust the start speed to make it less energetic. This can also be done while the shape menu is open. The visualization in the view port can be manipulated by clicking and dragging the little squares which affects the speed, angle and radius of the cone shape. (this can also be done with the other shape nodes if you prefer it as opposed to putting in dimensions.
Lets also adjust the start speed to make it less energetic. This can also be done while the shape menu is open. The visualization in the view port can be manipulated by clicking and dragging the little squares which affects the speed, angle and radius of the cone shape. (this can also be done with the other shape nodes if you prefer it as opposed to putting in dimensions.
Now for more advanced features.
|
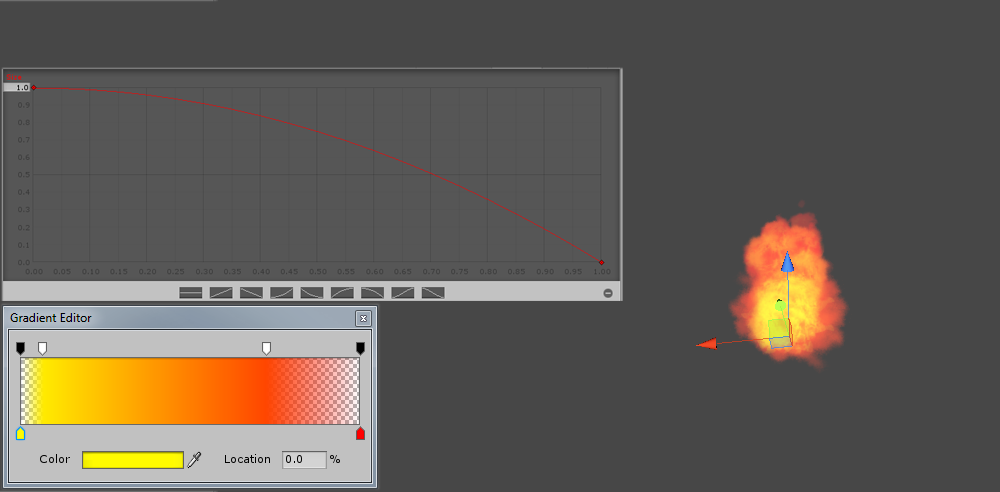
Enable colour over lifetime the top arrows control the alpha, or opacity allowing particles to fade if you're using the default particles or a more versatile material, such as a grey scale one you can use the bottom arrows to control the hue. The particles> additive material I'm using allows this change in hue and it works best on more grey scaled textures. Next tick size by life and you'll see a bezier curve.
|
|
Over time we want the particles to shrink so we shall make the curve slope down from 1.
This would be another good time to make some adjustments on previously visited nodes, depending on what you're aiming for, you may want it bigger or thicker.
This would be another good time to make some adjustments on previously visited nodes, depending on what you're aiming for, you may want it bigger or thicker.
Next we shall check rotation over life which will give us some more randomization and movement, similar to start rotation we will click the black arrow and select random between 2 constants.
This affects the rotation speed so we are going to use a value more like 40 and -40.
This affects the rotation speed so we are going to use a value more like 40 and -40.
|
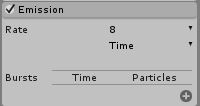
Now that we have our basic speed its time to go back and make adjustments, especially to emission which we forgot about. Ideally you want to use as few particles as you can so half the emission and start adjusting start size and speed and lifetime until you get a good shape.
|
|
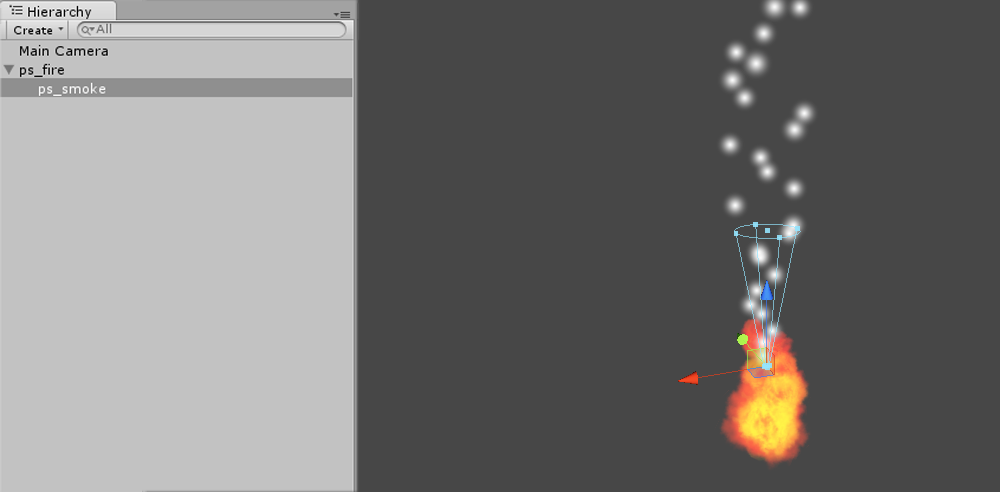
Next its time for smoke, scroll to the top and press the plus button, this adds a new particle system parented under the original one and name the new system. If you have a material to use apply it now. And lets start again with shape, making it quite narrow at the bottom
|
We can also move the origin of this system above the original because they're parented they will retain that offset. This is done by selecting the system in the hierarchy, it will be parented to the original fire particle.
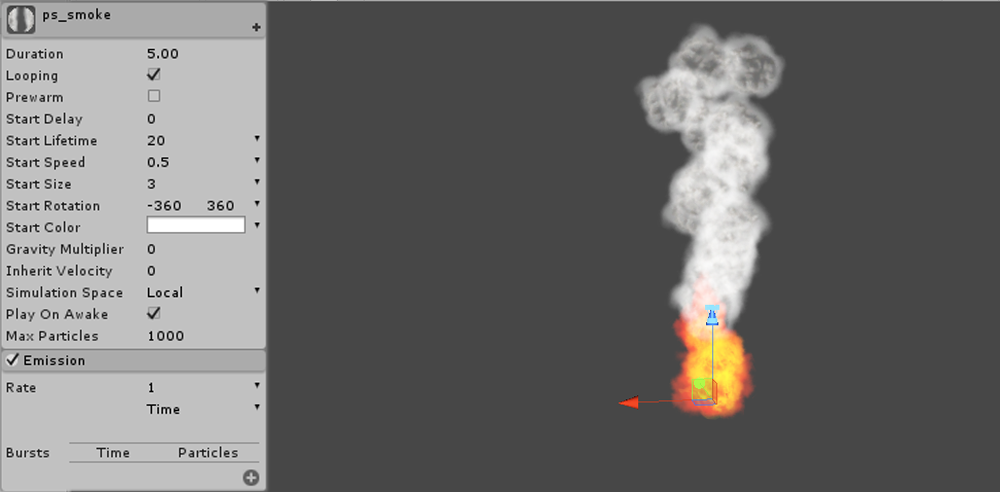
Next lets fix the speed (.5 feels good), the smoke should be a lot calmer than the fire. |
|
|
Adjust the start lifetime so that the smoke pillar stretches out to a decent amount. I like my pillars to be tall enough to see from a distance but not all games have tall ones. But now there's way too many particles so lets fix the emission rate, cut it to about half or a quarter of what it was, then adjust the start size to fill out the gaps.
|

|
|
Now size over lifetime, this time we will do the reverse of the fire and start small and end up large. This usually means going back and fixing the start size node to fill out empty spaces.
Now size over lifetime, this time we will do the reverse of the fire and start small and end up large. This usually means going back and fixing the start size node to fill out empty spaces. Next up is the opacity. Lets start with start colour and adjust the alpha channel until the smoke looks more faded out. And finish it off with some colour over life to give it more softness when fading in and out. And dont forget the rotation nodes to make it look more random. |
|
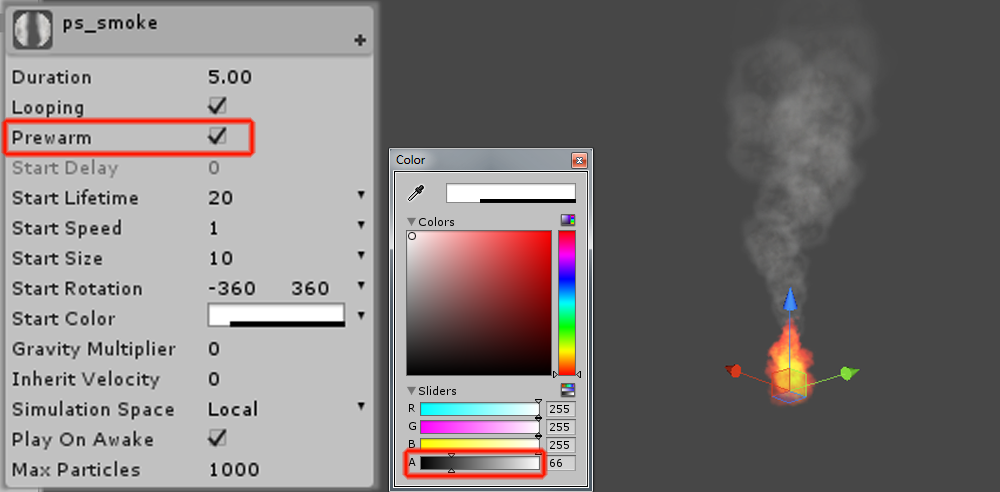
Now when starting up the system the smoke will take a very long tome to form a tower if that's what you're going for. To create it instantly tick on prewarm and it will create the smoke tower as if its been running until the first particle has run its lifetime.
Overall the system will need a lot of adjustment afterward to get it how you like it and correct any weirdness.
Overall the system will need a lot of adjustment afterward to get it how you like it and correct any weirdness.
Bonus Tutorial!
If you're not using post process bloom in your scene there is a way to fake particle bloom within shuriken.
|
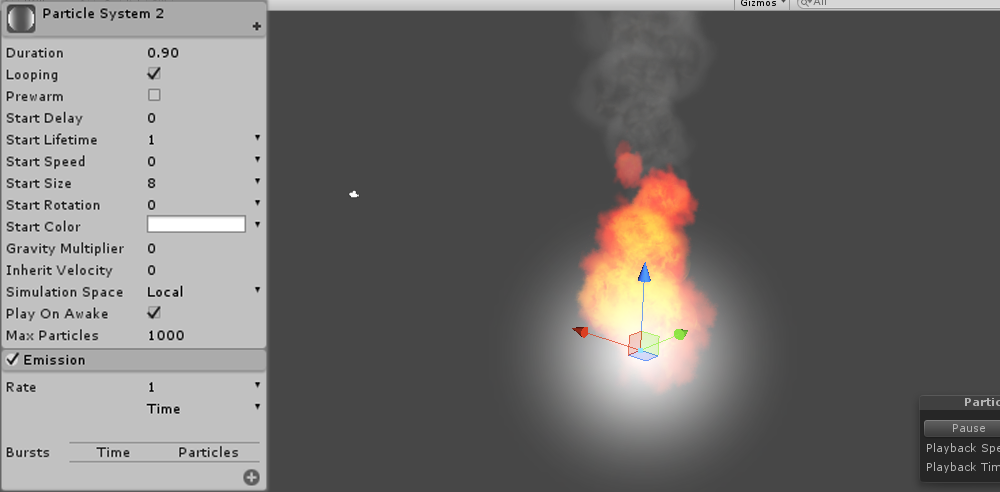
Press the plus sign button next to the smoke particles in shuriken to create a new system. This one will be using the default particle material so no need to grab a new texture.
Firstly reduce the start speed to 0 and set emission duration and start lifetime to 1. |
|
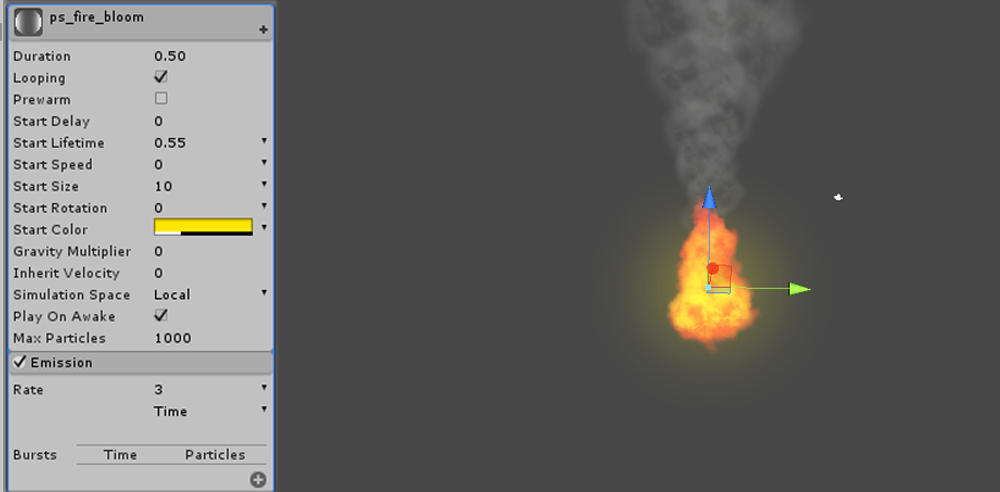
Next set the shape to a box with all dimensions at 0. This will make all particles spawn at the same point. Then change the start size to be large enough to create a large halo around the fire. Adjust its position to be more in the center of the fire. Then change the start colour to be something closer to orange or whatever colour your fire is and reduce the alpha opacity. And there you have a passable glow effect.
|
To go even further you can make it look like this glow is flickering.
adjust the lifetime and duration so that they are shorter and make sure that lifetime lasts slightly longer than duration, this creates a new particle slightly before the old one dies helping to create the flicker effect. |
|
Increase the emission rate as well until you get a sustained effect that appears to flicker but not completely die. Like the main fire effect this may take some tweaking before it
